How to Blur Background in Photoshop: Step by Step Guide for Beginners

Background of an image can complement or ruin your composition. It’s your job to present your composition with a complementary background to the viewers. If your photo background contains flaws or spoils your photo, you have to fix it by applying the necessary photo editing techniques. Blurring image background is one such technique that can bring out a top-notch output for you.
You will often notice image background showing up very cluttered and taking the attention from the subject. But that doesn’t mean we should leave the image like that. In such an image, we can bring the focus back on the subject and make it stand out blurring the background.
How to Blur Background in Photoshop
So, are you excited to learn the art of background blurring? We will demonstrate it to you in this tutorial using the most popular image editing software Adobe Photoshop. Hence, stay glued to the tutorial and pick up the step-by-step process of blurring a photo background in Photoshop.
Step 1: Open your Image and Duplicate the Background Layer
At first, open the image of which you want to blur the background. Duplicate the background layer and rename it. We renamed the duplicated layer “Foreground” for better understanding.
Step 2: Make a Selection of the Subject
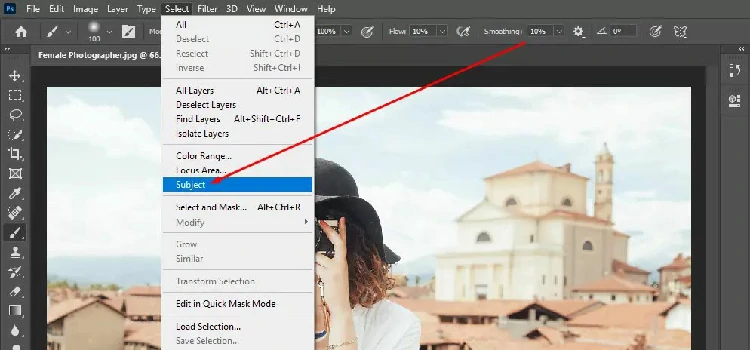
The next step is to select the subject and remove it from the background. You can select the subject with the Quick Selection tool, Lasso tool, Pen tool, etc. But we have selected the subject with AI-based Adobe sensei technology available in Photoshop’s latest versions. To do so, click the Select tab from the menu bar and select Subject.
Since it’s an AI feature, it may take a little time to apply the selection. Once you notice a dashed path over the edge of the subject, you should understand that the subject is selected.
Step 3: Go for Expanding the Selection
To remove the subject with perfection, we would expand the selection. To expand, go to the Select tab again from the menu bar, click Modify and then select Expand. You will notice a gap between the selection and the edge of the subject.
Step 4: Select > Modify > Expand
Step 5: Remove the Main Subject Using Content-Aware Fill
This gap will allow a smooth transition. Now, to remove the subject from the background, go to Edit in the menu bar and Select “Content-Aware Fill”. This will show you a preview window with the subject removed. Before applying the fill and pressing Ok, make sure you are outputting to the Duplicate Layer.
Step 6: Create a Layer Mask
Now, create a layer mask in the foreground layer by clicking the new layer mask icon at the bottom of the Layers panel. The mask will be created instantly.
Step 7: Go for Contracting the Mask
We expanded the selection to 5 Pixels before. Hence, we have to contract the mask to remove the mask border showing up on the subject edge. To do so, go to Filter, click Other and then select Minimum to set the Radius.
Step 8: Filter > Other > Minimum
We set the Radius to 6 pixels for better contraction. Make sure to set the Preserve to Roundness before pressing Ok as it’s a human subject.
Step 9: Convert the Background Copy Layer to Smart Object
Now, to blur the background, select the Background Copy layer and convert it into a smart object at first as it will allow you to apply editable adjustments, filters, and transformations. So, you can make changes anytime.
Step 10: Apply the Blur Filter
Now, go to Filter again, click Blur Gallery and then select Tilt-shift filter. This will trigger your image to show up on the screen with a blurry background. But it may not be satisfactory and so you have to make a few adjustments.
Step 11: Filter > Blur Gallery > Tilt-shift
You can spot two solid lines and two dashed lines showing up on the screen. The pixels between two solid lines will be in focus and the pixels between a solid line and a dashed line will show a gradual transition to blurriness. And the pixels beyond dashed lines are totally blurred. You can drag these lines and also blur the slider to bring out the output you want.
Final Result
Finally, the image shows up with a sharp subject and blurry background.
You may also read: How to Add Gaussian Blur in Photoshop
This is it!!! We have shown you the easiest method of blurring the background in Photoshop. Hopefully, you benefited enormously from the tutorial. Applying this tactic, you can easily isolate distracting parts of your image background and spice up your image.
Till we come up with another exciting tutorial, stay connected to us by following our social media pages. Visit our website to know more about us!!!


