How To Fix An Overexposed Photo?

Many photographers find overexposure or underexposure to be a big problem in their flow of work. This can be really frustrating especially after a busy day of shooting when you find that many of your images are wrongly exposed. Read below to find out how to fix an overexposed photo in Photoshop.
The Problem of Overexposure
Exposure is the measurement of how much light enters the sensor through the camera aperture when a photograph is captured. The final amount of light or darkness in the image depends on the exposure. The more the film or camera sensor is exposed to light, the brighter the image will be, and vice versa.
Overexposure results when too much light hits the film or camera sensor in the case of a digital camera. Overexposed photos become extremely bright, as a result, many details in the highlights seem washed out.
Underexposure is the result of not enough light hitting the film strip or camera sensor. Underexposed photos get very dark, as a result, you will find very little details in shadows and the photos will appear gloomy.
Exposure is a creative choice, and there is not any predetermined correct exposure for a specific photo. The perfect exposure for a photo depends on what mood, emotion, and feeling you want to portray in that particular photo.
Some photographers consider correct exposure to be a natural photo in which there is a good balance between highlights and shadows and no information is lost. While other photographers might deliberately overexpose or underexpose a photo to hide unwanted details or convey a specific emotion.
Understanding Histogram
A histogram is a tool in your camera that lets you know whether your photo is overexposed or not. It shows the graphical representation of the tonal range of the exposed photos. It is divided into three equal parts namely dark tones, mid-tones, and light tones.
If you understand how to read histograms for exposure, it is easy to find out whether your photos are overexposed or not. For a balanced exposure, the pixels in different areas should be even and should not be shifted towards the left or right.
If the majority of the pixels fall into the left areas, the photos would appear darker. On the other hand, if they fall in the right areas, there will be more highlights in the photos and be brighter.
Courtesy: Expert Photography
How to Fix an Overexposed Photo in Photoshop
Overexposed and underexposed photos are quite common to almost every photographer. These exposure problems can be fixed with post-processing software like Adobe Photoshop and Lightroom. There are actually many ways you can fix an overexposed photo in Photoshop. Below we are going to describe a few of them.
1. Using Photoshop Sliders
There are various Photoshop sliders such as brightness/ contrast, exposure, highlights/shadows sliders that can be used to fix an overexposed photo in Photoshop. You can explore these sliders by clicking Image>Adjustments from the top menu.
For example, moving the exposure slider to the right or left will increase or decrease the exposure levels respectively. You can try it out with other sliders too to see the effects on your photo.
2. Using Adjustment Layer and Layer Blending Mode
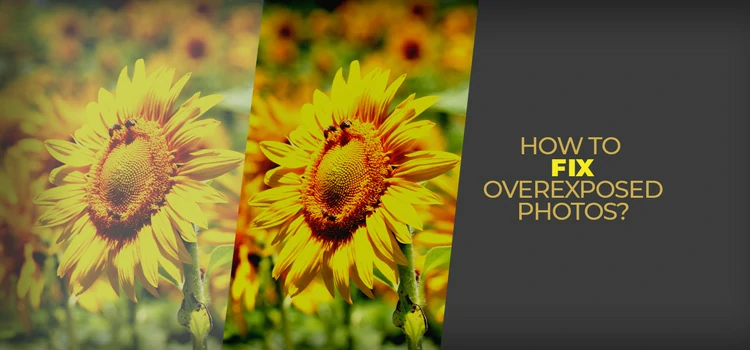
You can quickly fix an overexposed photo in Photoshop CS6 using a simple levels adjustment layer and a blending mode or blend mode. The blending mode we are going to use here is Multiply. Multiply is one of several blend modes in Photoshop that darkens an image. To apply this effect, we are going to use the below sunflower image as the original image.
Photo by Rodolpho Zanardo from Pexels
Step 1: Add a Levels Adjustment Layer
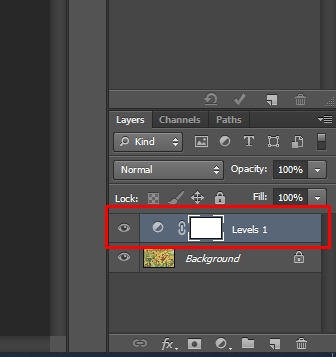
With the image just newly opened in Photoshop, if we look at the layers panel, there is only one layer available there- that is the background layer.
To darken the image, you need to create a new level adjustment layer. To do so, click on the New Fill or Adjustment Layer icon at the bottom of the Layers panel. Choose Levels from the drop-down menu.
Now, we can see that a new levels adjustment layer is created which is named Levels 1.
Step 2: Change the Adjustment Layer’s Blend Mode to Multiply
You can find the blend mode in the upper left corner of the layer’s panel. Choose the blend mode ‘Multiply’ from the drop-down menu. Once the Multiply mode is selected, the photo will be darker immediately. As a result, there will be more details in the highlights and colors will look more saturated.
Step 3: Decrease the Opacity of the Adjustment Layer
Once you apply the blend mode, if you feel that the image looks darker than you wanted, you may decrease the opacity from the upper right corner of the layer’s panel to bring back the brightness to the desired level.
After all the steps are followed, we get our final image which has more details than the original image in the highlighted areas. So we finally fixed our overexposed photos in Photoshop.
Before or After
To compare the final image with the original, you can click on the visibility icon on the layers panel.
It is possible to make a side-by-side comparison by placing both images adjacent to each other. Like the below image-
You may also read: How to invert colors in Photoshop?
To Conclude
Photoshop makes it quite easy to fix minor exposure problems as we have learned in this tutorial in the case of overexposed photos. This technique works great with casual, everyday photos, but it may not give the best results in the case of professional photos where mastery of the levels adjustment layer is needed.


